Crash Course: Computer Vision
This is the companion article for my presentation about computer vision at Evanston Township High School. This presentation is part of the requirements for my participation in NASA's Lunabotics Challenge.
Computer Vision
According to Wikipedia:
"Computer vision is an interdisciplinary field that deals with how computers can be made to gain high-level understanding from digital images or videos."
In other words, computer vision is the field that deals with making computers see things. It is called interdisciplinary because two disciplines are involved: science and engineering. Scientists are concerned with the theory behind artificial systems that extract information from images. Engineers apply those theories to automate tasks that the human visual system can do.
Some of these tasks include:
- Scene reconstruction: building 3D models from images and videos.
- Object and event detection: detecting objects and events in images and videos.
- Activity and object recognition: recognizing and classifying activities and objects in images and videos.
- Video tracking: tracking the motion of an object through a video.
- 3D pose estimation: determining the positions of a person's limbs in an image or video.
- Image restoration: improving the quality of images.
Since there are unlimited possible images and computers have a limited amount of memory, it is impossible to tell a computer exactly how it should perceive every image. For this reason, it is necessary to use machine learning to teach the computer how to make inferences. Machine learning is the use of an algorithm whose performance improves over time as it is exposed to more data. This is what people are typically referring to when they talk about artificial intelligence.
Scene Reconstruction
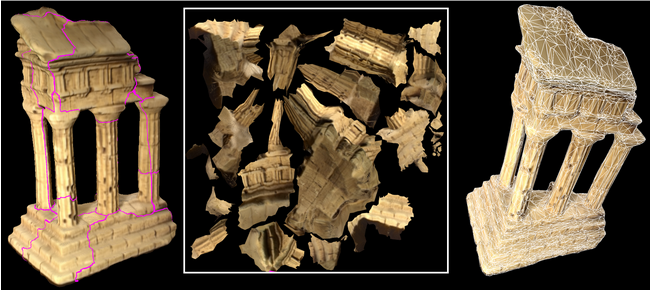
This image was created by Matthew Fisher from the Stanford Computer Graphics Laboratory.
Computers understand shapes as meshes of triangles. This image shows how the computer maps a generated texture onto the mesh of triangles to create a 3D representation of the scene.
Object Recognition and Video Tracking
This video serves as an introduction to the Jetson Orin Nano, which is the computer that will control our Lunabotics robot. The video contains several examples that demonstrate object detection and recognition and video tracking.
3D Pose Estimation
The video that is shown in the presentation is from the National Center for Biotechnology Information. Notice that the man in the video is not wearing any tracking devices, so the pose estimation must be entirely based on visual input.
Image Restoration
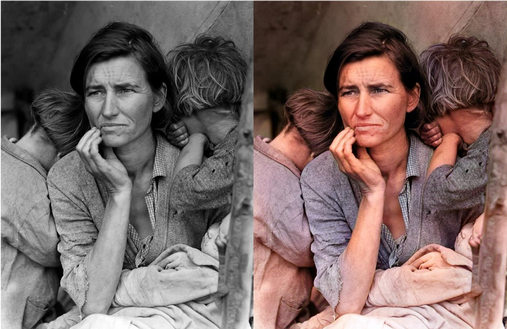
This image was restored using a project called DeOldify by Jason Antic. The original image is "Migrant Mother," taken by Dorothea Lange in 1936.
Computer Vision and the Lunabotics Challenge
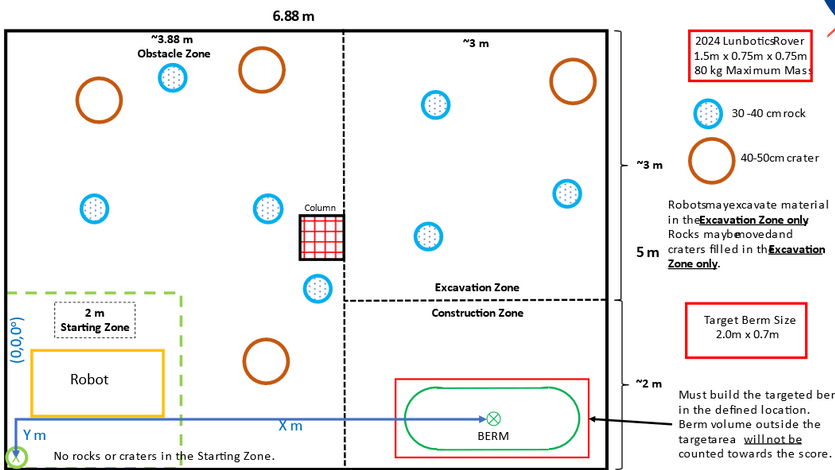
This image from the Lunabotics 2024 guidebook shows an example layout of the Artemis arena. Our robot will start in the starting zone. Its goal will be to excavate as much regolith as possible from the excavation zone and dump it in the berm in the construction zone. In order to do so, it will perform SLAM to navigate around rocks and craters. If we are able to fully automate the robot, we will score a ton of points in the competition in May.
Python
The following crash course in Python is designed only to cover the parts of the Python language that will be needed for the basic computer vision projects later on. In case you're interested in learning more, this companion article will mention other language features that you may want to look up by yourself.
Python is a high-level, general-purpose scripting language. High-level means that it abstracts away many of the details that a low-level language wouldn't, which makes it much easier to learn. In fact, Python is the most popular first programming language for new programmers to learn. General-purpose means that it can be used to write all kinds of programs, such as web development, game development, robotics, computer vision, machine learning, and more. It is called a scripting language because it is dynamic; more on that later. Because it is a scripting language, Python programs can also be called scripts.
The TIOBE index is a ranking of the popularity of programming languages. Python has been near the top for decades (11th place or higher since 2004), and it is now considered one of the "big four" programming languages, along with C, C++, and Java. It has also won the "Programming Language of the Year" award five times.
Getting Started
If you'd like to download Python on your own computer, you can do so from its website. If you choose to do so, I would also highly recommend downloading an integrated development environment (IDE) to program in, such as Visual Studio Code.
If you don't want to download Python, the best way to use it online is through Replit. You will need to make an account to do this.
"Hello, world!"
It is a tradition among programmers for the first program you write in a new language to print Hello, world! to the standard output (console or terminal). To do so in Python, write the following line of code:
print("Hello, world!")
Everything inside of the quotation marks is called a string, which is a list of characters. You can try changing it to print out other phrases.
Since Python is a dynamic programming language, we do not need to compile this program in order to run it. Instead, a program called an interpreter runs the code as-is. If you're using Python on your own computer, try saving this file as hello.py, then run the interpreter with the following command in your terminal:
python hello.py
Procedural Programming
Python is a procedural programming language, which means that Python programs are composed of a series of procedures that are executed sequentially (one at a time from top to bottom). In the following code snippet, the words One, Two, and Three will be printed to the standard output on different lines in that order.
print("One")
print("Two")
print("Three")
Imperative Programming
Procedural programming is a type of imperative programming. Imperative programs are composed of a series of statements that change the program's state. Statements and procedures refer to the same thing. For example, print("Hello, world!") is a statement.
Another type of statement is an assignment to a variable. Variables are values that vary. The previous examples printed literals, which are values that don't vary. By using the assignment operator, =, it is possible to assign a value to a variable. Variables can be printed just like literals:
my_variable = "Hello, world!"
print(my_variable)
The value of a variable can be changed by using the assignment operator again:
my_variable = "One"
my_variable = "Two"
print(my_variable)
In this example, the value of the variable called my_variable is set to "One", then it is replaced with "Two". When we then print my_variable, the output is Two.
Arithmetic
The arithmetic operators +, *, -, and / can be used to perform addition, multiplication, subtraction, and division, respectively.
print(3 + 3)
print(3 * 3)
print(3 - 3)
print(3 / 3)
Parentheses can be used to control the order of operations:
print(3 * (3 + 3))
Lists
In addition to strings and numbers, variables can also hold lists of values. Lists are created by surrounding comma-separated values with square brackets. The values inside of a list can be accessed by putting square brackets that contain the index of the value after the list. Lists are zero-indexed, meaning that the first value is at index zero.
my_list = ["Zero", "One"]
print(my_list[0])
print(my_list[1])
Lists can hold any type of value, including other lists!
my_list = ["Zero", 1, 2, [3, 4, 5]]
print(my_list[3][0])
In the example above, my_list has another list at index 3, so we can use yet another pair of square brackets to access elements inside of the inner list.
Structured Programming
Structured programming improves the clarity of programs through the use of conditionals, loops, blocks, and functions. Blocks are sections of code that are executed together. Examples will follow.
Conditionals
Conditionals are statements that execute a block of code depending on a given condition. In Python, every value is either truthy or falsy. Empty strings, empty lists, the number 0, and the literal value False are all falsy; almost every other value is truthy.
True and False are called Boolean values. Boolean values can be created by using the comparison operators: == (equals), > (greater than), < (less than), >= (greater than or equal to), <= (less than or equal to), and != (not equal to).
if statements execute a block of code if the given condition is truthy:
if 1 < 2:
    print("Correct")
Because 1 is less than 2, the comparison 1 < 2 becomes the literal value True, so the print statement is executed. Notice that the print statement is indented from the if statement. In Python, indentation is used to delineate blocks.
if 1 < 2:
    print("One")
    print("Two")

if 1 > 2:
    print("Three")
    print("Four")

print("Five")
In the example above, One and Two will be printed because 1 is less than 2. Three and Four will not be printed because 1 is not greater than 2. Five will be printed because it isn't inside of an if statement at all.
if statements are an example of control flow, which is the order in which individual statements in an imperative program are executed. Other control flow statements include elif ("else if") and else statements.
if 1 > 2:
    print("One")
elif 1 < 2:
    print("Two")
else:
    print("Three")
In this example, since 1 > 2 is False, the script will then continue on to the next conditional. Then, since 1 < 2 is True, it will print Two. After that, since one of the conditions was met, the else block will be skipped. If both of the previous conditions had been False, the else block would be triggered. It is possible to chain together multiple elif blocks before an else block.
It is also possible to put blocks inside of other blocks. This is called nesting.
if 1 < 2:
    print("One")

    if 1 > 2:
        print("Two")

    print("Three")
In this example, One will be printed because 1 < 2 is True. Then, because 1 > 2 is False, the second print statement will be skipped. Pay attention to the indentation, though: Three will be printed because it is only inside of the first conditional statement.
Loops
Loops are used to repeat a block. for loops execute a block once for each value in a list.
my_list = [0, 1, "Two", True, [4, 6, 8]]
for my_value in my_list:
    print(my_value)
In this example, the print statement will be executed once for each value in my_list. my_value will contain that value each time. On the first iteration, my_value will be 0, on the second, it will be 1, on the third, it will be "Two", and so on.
while loops execute a block while the given condition remains truthy. They are similar to if statements that happen multiple times.
i = 0
while i < 5:
    print(i)
    i = i + 1
In the example above, each number from 0 through 4 will be printed because i gets 1 larger at the end of each iteration. Then, when i becomes 5, i < 5 will be False and the loop will stop.
continue and break statements are used to further control loops. continue causes the loop to immediately proceed to the next iteration, and break causes the loop to immediately exit entirely.
my_list = [0, 0, 1, 0, 0, 0, 2, 0, 0, 3, 4, 0, 0, 5]
for my_value in my_list:
    if my_value == 0:
        continue

    print(my_value)
In this example, each integer from 1 through 5 will be printed. 0 will never be printed, because if my_value is 0, the iteration will be skipped before arriving at the print statement.
i = 0
while True:
    if i > 5:
        break

    print(i)
    i = i + 1
In this example, each integer from 1 through 5 will be printed. True will never be falsy, so the loop would continue forever if it weren't for the break statement.
Functions
Functions are subroutines, which are reusable blocks. Functions can be defined with the def keyword, after with point they can be called (executed) from anywhere by putting a pair of parentheses after the function's name.
def my_function():
    print("One")
    print("Two")

my_function()
my_function()
In this example, the lines One, Two, One, and Two will be printed, in that order.
Functions can also take arguments (parameters) to change what they do. Giving a value to a function is called passing that value to the function.
def print_twice(my_argument):
    print(my_argument)
    print(my_argument)

print_twice("One")
print_twice("Two")
In this example, the lines One, One, Two, and Two will be printed, in that order. You might notice that print itself is a function. print is one of many functions that is automatically included in every Python program from the Python standard library. Other functions from the standard library include len, which determines the length of a list, and str, which casts (converts) any value into a string.
The return keyword is similar to break, but it is used for functions instead of loops. Executing a return statement from within a function causes that function to immediately exit, and the script will continue from where it was called.
def print_once(my_argument):
    print(my_argument)
    return
    print(my_argument)

print_once("Hello, world!")
In this example, only one line will be printed because the function returns before it gets to the second print statement.
The return keyword can also be used to make a function return a value to be used elsewhere in the script. For example:
def multiply_by_five(my_number):
    return my_number * 5

print(multiply_by_five(3))
In this example, 3 is passed to multiply_by_five. Then, inside of multiply_by_five, the value of my_number will be 3. multiply_by_five returns 3 * 5, which is then printed from outside of the function.
Importing Code
Code from other files and libraries can be imported with the import keyword.
import cv2
Imagine that you have two files in the same directory. The first, one.py, contains the following code:
my_variable = "Hello, world!"
The second file, two.py, can then import the variables and functions from one.py as follows:
import one
print(one.my_variable)
The . operator is used to access a variable or function that "belongs to" an imported file or library.
OpenCV
OpenCV is an open-source computer vision libray. It provides functions that allow us to manipulate images. If you're using Python on your own computer, install OpenCV using a terminal:
pip install opencv-python
Then, import it in any Python file with import cv2.
If you're using Replit, you'll need to use the official Python OpenCV template.
Image Manipulation
Images are stored as columns of rows of pixels. Each pixel is stored as a list of three numbers representing the red, green, and blue values of the pixel, respectively. In other words, images are lists of lists of lists.
Images can be loaded using the imread function, and they can be saved using the imwrite function. For example, we can copy an image called a.png to a file called b.png like this:
import cv2

my_image = cv2.imread("a.png")
cv2.imwrite("b.png", my_image)
If we want to modify the image, we can do so in between the calls to imread and imwrite.
We can iterate over the pixels in an image like this:
for row in my_image:
    for pixel in row:
        do_something()
Image Processing
Depending on what we want to do with an image, it can be useful to modify that image in some way ahead of time. For example, if we are trying to detect objects in order to avoid them, we only need to see their outlines - color information is irrelevant and might make it harder for an algorithm to learn.
If we want to make an image grayscale, we can do so by setting the red, green, and blue values of each pixel to the luminance of that pixel. Luminance is calculated as follows:
Where is the luminance, is the red value, is the green value, and is the blue value.
Putting it all together, we get this script to convert an image a.png into a grayscale version b.png:
import cv2

my_image = cv2.imread("a.png")

for row in my_image:
    for pixel in row:
        [red, green, blue] = pixel
        luminance = red * 0.2126 + green * 0.7152 + blue * 0.0722
        pixel[0] = luminance
        pixel[1] = luminance
        pixel[2] = luminance

cv2.imwrite("b.png", my_image)
Alternatively, we can just use OpenCV's built-in function for doing the same thing:
import cv2

my_image = cv2.imread("a.png")
my_image = cv2.cvtColor(my_image, cv2.COLOR_RGB2GRAY)
cv2.imwrite("b.png", my_image)
Once an image has been converted to grayscale, we can perform a further operation called thresholding to convert it to black and white.
import cv2

my_image = cv2.imread("a.png")
my_image = cv2.cvtColor(my_image, cv2.COLOR_RGB2GRAY)

for row in my_image:
    for pixel in row:
        luminance = pixel[0]
        if luminance > 127:
            pixel[0] = 255
            pixel[1] = 255
            pixel[2] = 255
        else:
            pixel[0] = 0
            pixel[1] = 0
            pixel[2] = 0

cv2.imwrite("b.png", my_image)
Again, OpenCV has a built-in function for performing the same action:
import cv2

my_image = cv2.imread("a.png")
my_image = cv2.cvtColor(my_image, cv2.COLOR_RGB2GRAY)
_, my_image = cv2.threshold(my_image, 127, 255, cv2.THRESH_BINARY)
cv2.imwrite("b.png", my_image)
Edge detection - that is, finding outlines - is a more complex process because it requires knowledge of surrounding pixels. For operations like this, we use a convolution kernel to modify each pixel based on the pixels around it. A convolution kernel is a matrix that represents the weight of each surrounding pixel towards the product. For example, in order to blur an image, you could use a convolution kernel that gives equal weight to all of the surrounding pixels:
OpenCV provides the blur function for this purpose.
import cv2

my_image = cv2.imread("a.png")
my_image = cv2.blur(my_image, (5, 5))
cv2.imwrite("b.png", my_image)
A similar function, GaussianBlur, is designed to be effective at removing Gaussian noise from an image.
import cv2

my_image = cv2.imread("a.png")
my_image = cv2.GaussianBlur(my_image, (5, 5), 0)
cv2.imwrite("b.png", my_image)
We can also use convolution kernels to calculate the intensity gradient of an image. The intensity gradient is a measure of how much of a difference there is from one pixel to the next.
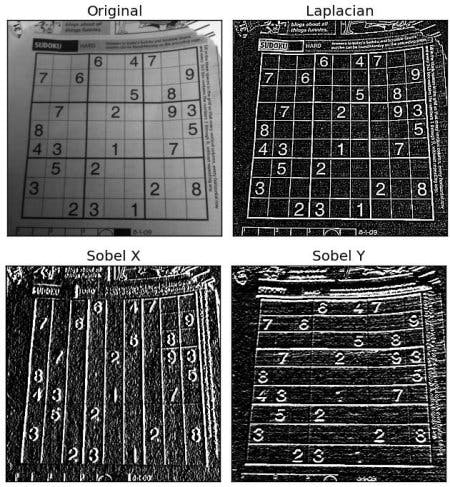
This image is from the OpenCV Python Image Gradients tutorial. It demonstrates three different types of intensity gradients: Laplacian, Sobel X, and Sobel Y. Each uses a different convolution kernel. For example, the following convolution kernel can be used to calculate the Laplacian gradient of an image:
Using blurring and intensity gradients, we can perform Canny edge detection as follows:
- Perform Gaussian blurring in order to remove Gaussian noise from the image. This makes it less likely that we will detect a noise artifact as an edge.
- Determine the intensity gradient of the image. This is typically done in two parts - once for horizontal edges, and once for vertical edges.
- Remove pixels that aren't local maxima (can't possibly be edges).
- Hysteresis thresholding: remove pixels that can't be edges (based on a minimum threshold), mark pixels that must be edges (based on a maximum threshold), and determine which pixels that might be edges are actually edges (based on whether they touch other edge pixels).
Again, OpenCV provides a function for this:
import cv2

my_image = cv2.imread("a.png")
my_image = cv2.Canny(my_image, 100, 200)
cv2.imwrite("b.png", my_image)
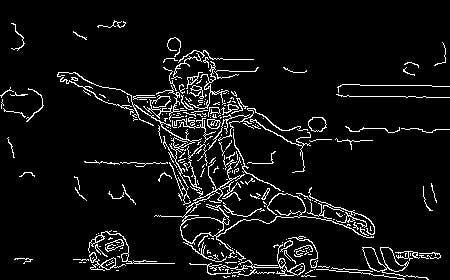
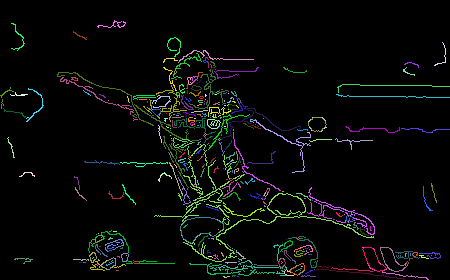
Now that we've detected all of the edges, we can finally detect the contours. Contours are curves that join all of the continuous points with the same intensity. They can be thought of as the subset of edges that outline things. Conceptually, contours can be found via the following process:
- Perform edge detection on an image.
- Create an undirected graph of all of the edge points.
- Search the graph for cycles. Those cycles are contours.
OpenCV provides another function for this:
import cv2
import numpy
import random

my_image = cv2.imread("a.png")
edge_image = cv2.Canny(my_image, 100, 200)

mode = cv2.RETR_TREE
method = cv2.CHAIN_APPROX_SIMPLE
contours, hierarchy = cv2.findContours(edge_image, mode, method)

# Create a blank image to draw the contours in.
contour_image = numpy.zeros(my_image.shape)

# Draw each contour with a different color.
for i in range(len(hierarchy[0])):
    red = random.random() * 0xFF
    green = random.random() * 0xFF
    blue = random.random() * 0xFF
    color = (red, green, blue)
    cv2.drawContours(contour_image, contours, i, color)

cv2.imwrite("b.png", contour_image)
Update 5/20/2024
UIC won the following awards for Lunabotics 2024:
- First place at the UCF semifinals.
- Fifth place for autonomy.
- The judges' innovation award.
- A special recognition for mission control operation.